Mato

Posts : 90
Points : 208
Join date : 2009-10-27
Age : 43
Location : Sydney
 |  Subject: Making A Bobber Seat Subject: Making A Bobber Seat  Tue Apr 27, 2010 5:09 pm Tue Apr 27, 2010 5:09 pm | |
| Ok this tec tip comes from a good friend of mine Jmac over at the rattlers web site in New Zealand
http://www.rattlers.co.nz/forum/
'Bones of your Ass' Do it yourself pan & covering
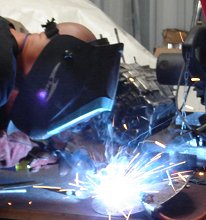
Here is brief outline on how to build a 'Bones of your ass' style seat. If you dont have your own welder you will need to get someone to tag in the mounting bolts, this is a pretty quick and easy job which should only cost a few bucks!
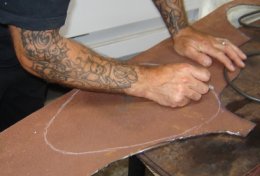
For this seat we are using a scrap piece of 2.5 ml sheet. Using a piece of chalk, sketch your basic outline. You may need to do it a few times till you get the shape you want. If you get one side looking good, make a paper copy and flip it to trace out the other side.
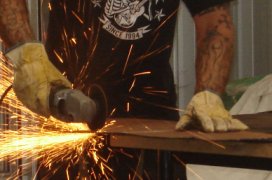
Use a cut-off disc to cut out your shape, these discs are nice and thin and manoeuvre around curves well, avaliable at most hardware stores for about $5. You dont need to push real hard, just let the disc do the work, and it will last longer.
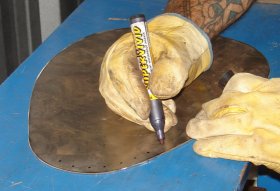
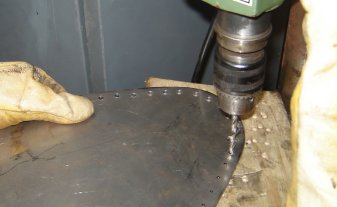
Once you have it cut out, clean up the sharp edges with a file or if you have one a polishing disc. The next job is to mark out a series of evenly spaced dots 1cm inside ,and around the perimeter of the pan. Once you have them looking right, centre punch them and proceed to drill them. You will need 5ml diametre holes for your binding leather or vinyl to pass through. It would pay to grab your binding from your local craft or fabric shop in advance so you can check it will pass through your holes twice. This way you wont have to re-drill them all if it doesnt fit. You will need 5mtrs of binding in one continuous length, it seems a lot but better to have too much than not enough, this will cost around $6.

Once you have cleaned up the rough edges around your drill holes, its time to beat this thing into shape. We have our trusty piece of pipe which serves us well, but you could use the edge of a bench or an old car tyre for example. Use a rubber mallet if possible but you could bash this with almost anything, just take your time, you can always bash it flat again if don't like the way its looking. Get a decent curve at the rear and a little at the front, but really its up to you to beat out a shape you like.
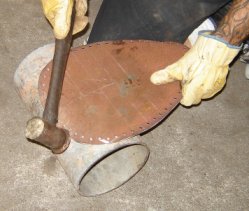


The last part of building the pan is to weld in four mounting bolts.Two for your front bracket and two spring fixture points. In the picture below you will see positions for these although the spring fastening positions at the rear can pretty much go where you want them. Just make sure they are clear of your holes.

Time to clean up the pan with a wire brush and give it a coat of rust proof paint, aerosol or brush on.
Ok, as for a do it yourself covering, check out the following instructions.I will add some photo's here when i do my next seat.
You will need a peice if 1" upholstery foam and a piece of vinyl or soft leather, enough to cover and come underneath the pan about 2 inches. If you have drilled all the holes and are planning a lace up, then cut your foam to stop at the inside of the line of holes and then using a new stanley knife blade slice an angle from and around the perimeter edge of the foam so it slopes down towards your perimeter of holes.Use Ados glue to attach your foam, trace the outline of your pan onto your material and cut it with 2" extra for wrap around.
You will need a sissor action style hole punch which you can get from a craft store of about $5, with various hole punch sizes. Lay your material over your pan, fold the edge under and punch ahole.Feed thru your leather lace till you reach the middle of the lenght of the lace, punch your next hole and start your lace-up. It can be a bit tricky at first and may require a few attemps till you get the lace up correct so dont do to much if you think its not looking right, best to ask a female for help and start again ! Glue down any trouble spots sticking out underneath when lace up is done. Tie and knot your finished lace, glue it down if required.
If you plan not to lace and have not drilled all your holes then cut your foam 1" bigger than your pan, cut your material 2" bigger. Glue your foam in position,apply Ados to the underside of pan and edge of your covering material. Leave to dry for 5 mins then lay your pan top down on your material and start to wrap your covering edge over. Its best to pull and tack on the back and nose forst geting some good tension, then work the sides in .You are also stretching the 1" overlap of foam around the pan edge and under for the glue down. You may need to carefully cut out some triangles from the covering edge to make it fit ok as you are doing the glue down, but dont cut in to far towards the pan edge. Remember you are just banging out a homemade seat so dont worry to much if the underside is a little ruff, who's going to see it ? | |
|
walka
Posts : 13
Points : 29
Join date : 2010-04-25
| | Subject: Re: Making A Bobber Seat Tue Apr 27, 2010 5:24 pm | |
| | |
|
Williamson
Posts : 14
Points : 21
Join date : 2011-03-30
| | Subject: Re: Making A Bobber Seat Wed Mar 30, 2011 2:04 am | |
| great I do that but I have problem with mehanism I maked 4 time and I buyed new shocks but is very soft !!! I dont know where is mistake 10 cm is long , 5 cm bright ,1 cm step 5 mm is whire !!! ??? | |
|
Mato
Posts : 90
Points : 208
Join date : 2009-10-27
Age : 43
Location : Sydney
| | Subject: Re: Making A Bobber Seat Wed Mar 30, 2011 5:30 am | |
| | |
|
Williamson
Posts : 14
Points : 21
Join date : 2011-03-30
| | Subject: Re: Making A Bobber Seat Wed Apr 06, 2011 11:40 pm | |
| abaut seat spring !  | |
|
Williamson
Posts : 14
Points : 21
Join date : 2011-03-30
| | Subject: Re: Making A Bobber Seat Wed Apr 06, 2011 11:42 pm | |
| | |
|
Williamson
Posts : 14
Points : 21
Join date : 2011-03-30
| | Subject: Re: Making A Bobber Seat Wed Apr 06, 2011 11:47 pm | |
| | |
|
Williamson
Posts : 14
Points : 21
Join date : 2011-03-30
| | Subject: Re: Making A Bobber Seat Wed Apr 06, 2011 11:48 pm | |
| | |
|
Mato
Posts : 90
Points : 208
Join date : 2009-10-27
Age : 43
Location : Sydney
| | Subject: Re: Making A Bobber Seat Thu Apr 07, 2011 3:06 am | |
| ok i think i see what you mean the springs are to soft there is nor much you can do about that but what a lot of people are using is the spring and shock off a bicycle it may be better but you would need to make mounts and things to fit the seat and your bike 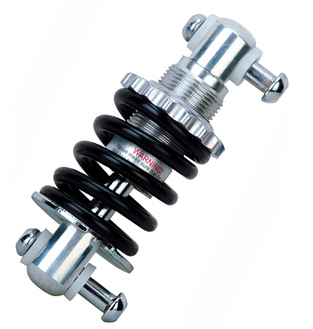 | |
|
Williamson
Posts : 14
Points : 21
Join date : 2011-03-30
| | Subject: Re: Making A Bobber Seat Thu Apr 07, 2011 12:12 pm | |
| yes I see this shocks for bicycle (this is central shock on bicycle ?) this look to me very hard  but now I dont know I wait new springs with other dimensions from 6 mm whire and 12 mm step and I make new seat ! until that is not finish I can drive whit this on picture ! ( old springs from zundapp seat (2.w.war  )) | |
|
Williamson
Posts : 14
Points : 21
Join date : 2011-03-30
| | Subject: Re: Making A Bobber Seat Thu Apr 07, 2011 12:26 pm | |
| | |
|
Mato
Posts : 90
Points : 208
Join date : 2009-10-27
Age : 43
Location : Sydney
| | Subject: Re: Making A Bobber Seat Fri Apr 08, 2011 2:59 am | |
| the angle of the seat and springs looks ok to me
but change to a diffrent type of spring first. i would try that befor anything else
also if you bike is a softail rear you could solid mount the seat and just have the springs for show
Exil night train has that set up springs but with solid mounts | |
|
Sponsored content
| | Subject: Re: Making A Bobber Seat | |
| |
|


